
Disclosure: Shed & Bench is reader-supported and may earn a commission from some products we recommend, at no extra cost to you. The free printable plan on this page contains no affiliate links. Read our affiliate disclosure.
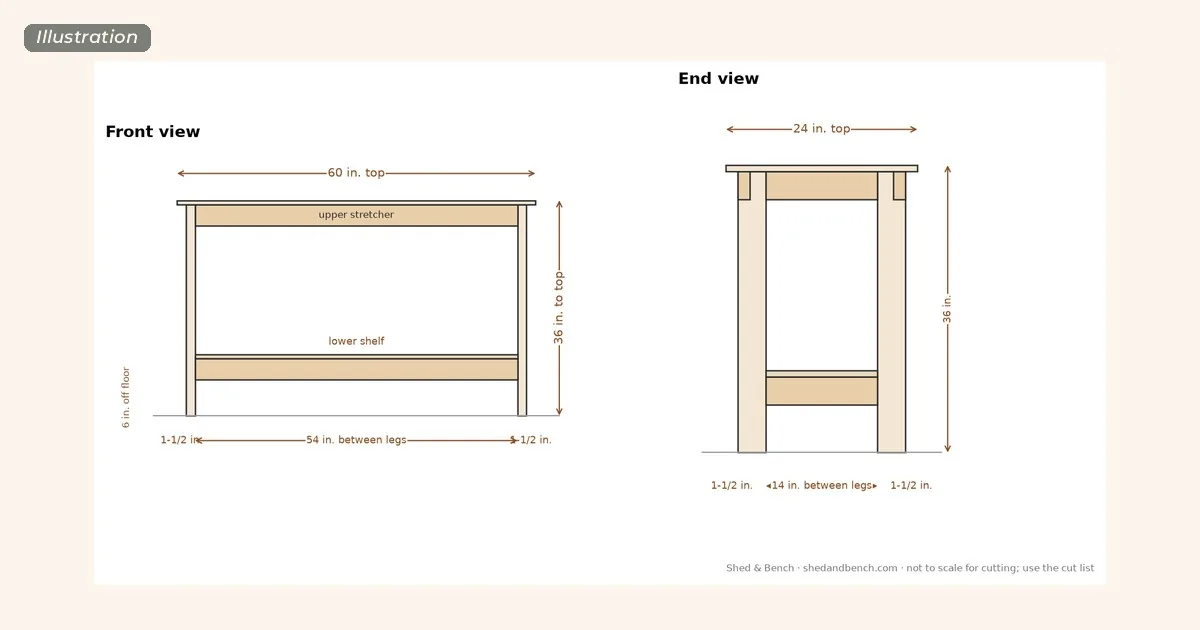
These free 2×4 workbench plans are for a simple, square-legged shop bench: a 60 × 24 in. plywood top at 36 in. high, a lower shelf, and a frame built from five 8-ft 2x4s.
You get a lumber shopping list, a cut list in actual lumber sizes, a board-by-board cutting plan, step-by-step instructions, five diagrams, and a printable PDF. Every joint is screwed. There are no angled cuts.
Free printable plan (PDF). Download the printable 2×4 workbench plan (PDF), no email required →
One printable file with the shopping list, cut list, cutting diagrams, key steps, and all five diagrams on this page.
Plain-language safety note: This design isn’t engineered or load-tested. No engineer has reviewed it, and nobody has tested how much weight it holds. We worked out the dimensions and checked that the parts fit together on paper, but how strong the finished bench is depends on your lumber, your fasteners, and how carefully it’s put together. Don’t treat the sizes on this page as a rated capacity. Check every screw before you put weight on the bench.
Who this plan is for
This is a good first larger shop project if you’re comfortable with a circular saw and a drill. Every cut is square, and every joint is two screws at each end of a rail or stretcher.
- Beginners who want a first workbench and already have a saw, a drill, and a couple of clamps.
- Anyone setting up a small shop who wants a 5-ft-long bench that can be built from boards you can haul in a car.
- People without a table saw. A circular saw and a straightedge will cut the plywood; a miter saw is helpful for the 2x4s but isn’t required.
Plan on one Saturday for cutting and assembly, plus time for sanding and finish (our estimate; your pace will vary). If you’re still putting a first shop together, see our small woodworking shop setup guide for bench layout, dust, and a starter tool list.
Tools: tape measure, speed square, pencil, circular saw or miter saw, a straightedge or guide for the plywood cuts, drill/driver, 1/8 in. pilot bit, countersink bit (optional), two or more clamps, sander or sanding block, safety glasses, hearing protection, and a dust mask. A pocket-hole jig is optional (see Step 2).
The plan at a glance
| Item | Size |
|---|---|
| Top | 60 in. long × 24 in. deep × 3/4 in. plywood, 36 in. high |
| Overhang | 1-1/2 in. on all four sides (a small clamp lip) |
| Base | 57 in. long × 21 in. deep, outside to outside of the legs |
| Legs | four 2x4s, 35-1/4 in. long |
| Upper stretchers | two at 54 in. (front and back) and two end rails at 14 in. |
| Mid support | one 2×4, 18 in., under the top at mid-length |
| Lower shelf | 54 in. × 14 in. × 3/4 in. plywood, surface 10-1/4 in. off the floor |
| Lower stretchers | two at 54 in. and two end rails at 14 in.; bottoms 6 in. off the floor |
| Lumber | five 2×4 × 8 ft and one 4×8 sheet of 3/4 in. plywood (optional sixth 2×4 as a spare) |
| Hardware | 36 of 3 in. construction screws (buy about 45) and 45 of 1-5/8 in. or 2 in. wood screws (buy about 55) |
Workbench dimensions, explained
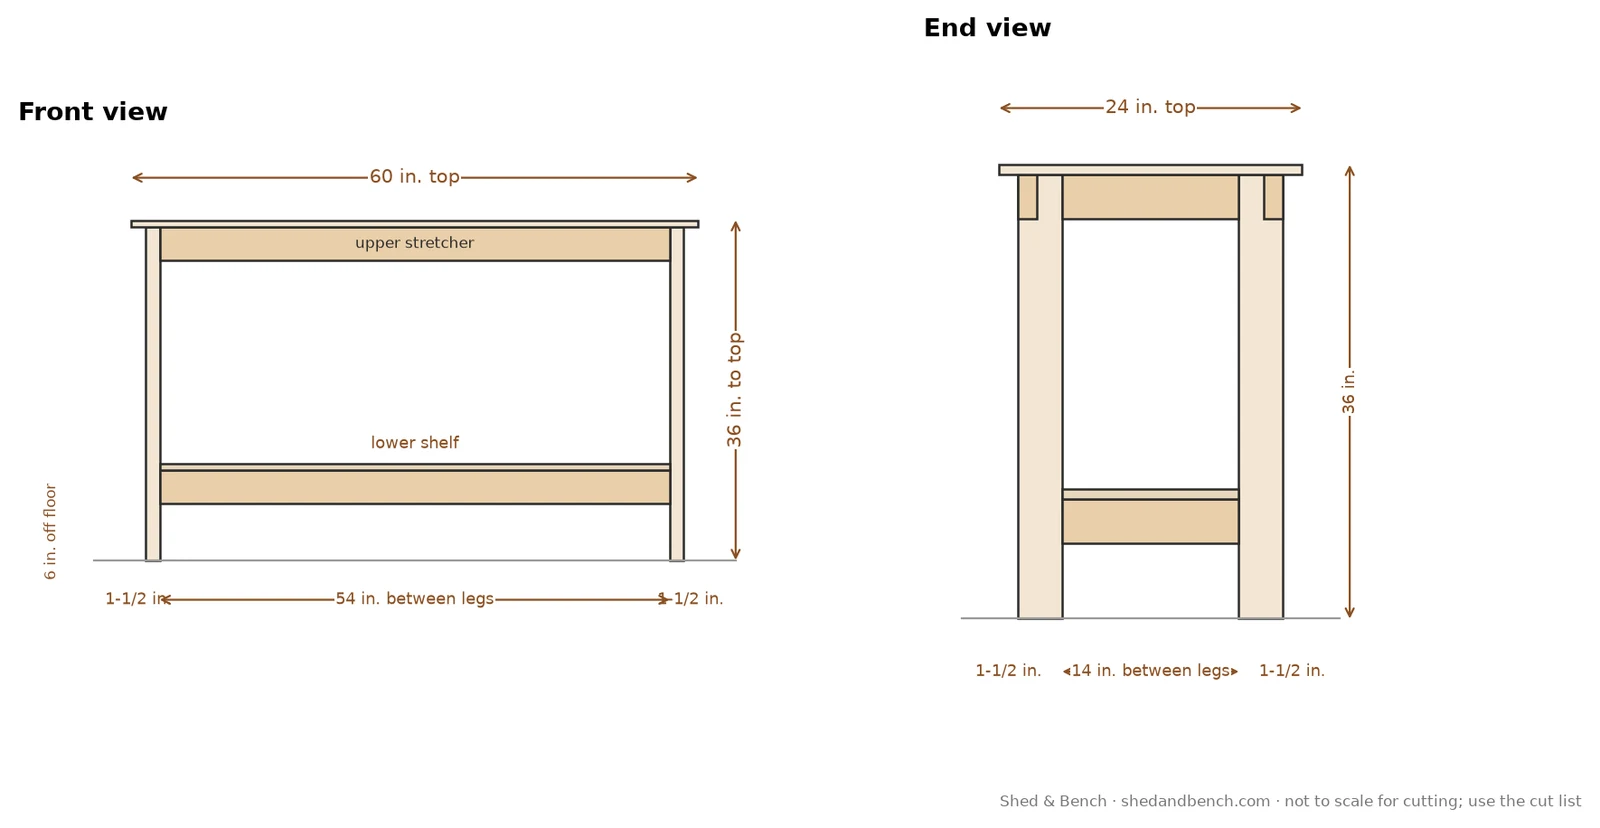
The top is 60 in. long and 24 in. deep, which is a comfortable size for a one-person bench and still fits through a standard doorway. The finished work surface is 36 in. high, a common standing height. If you want it lower, cut the legs shorter before you assemble the ends; keep the lower-rail height the same so the shelf doesn’t get too close to the floor.
The top overhangs the frame 1-1/2 in. on every side. That small lip gives clamps a place to bite and keeps the plywood edges from lining up flush with the legs. The four legs sit at the corners of a 57 in. × 21 in. rectangle. Between the legs there is 54 in. of length and 14 in. of depth, which is also the size of the lower shelf, so the shelf is a simple rectangle that drops in.
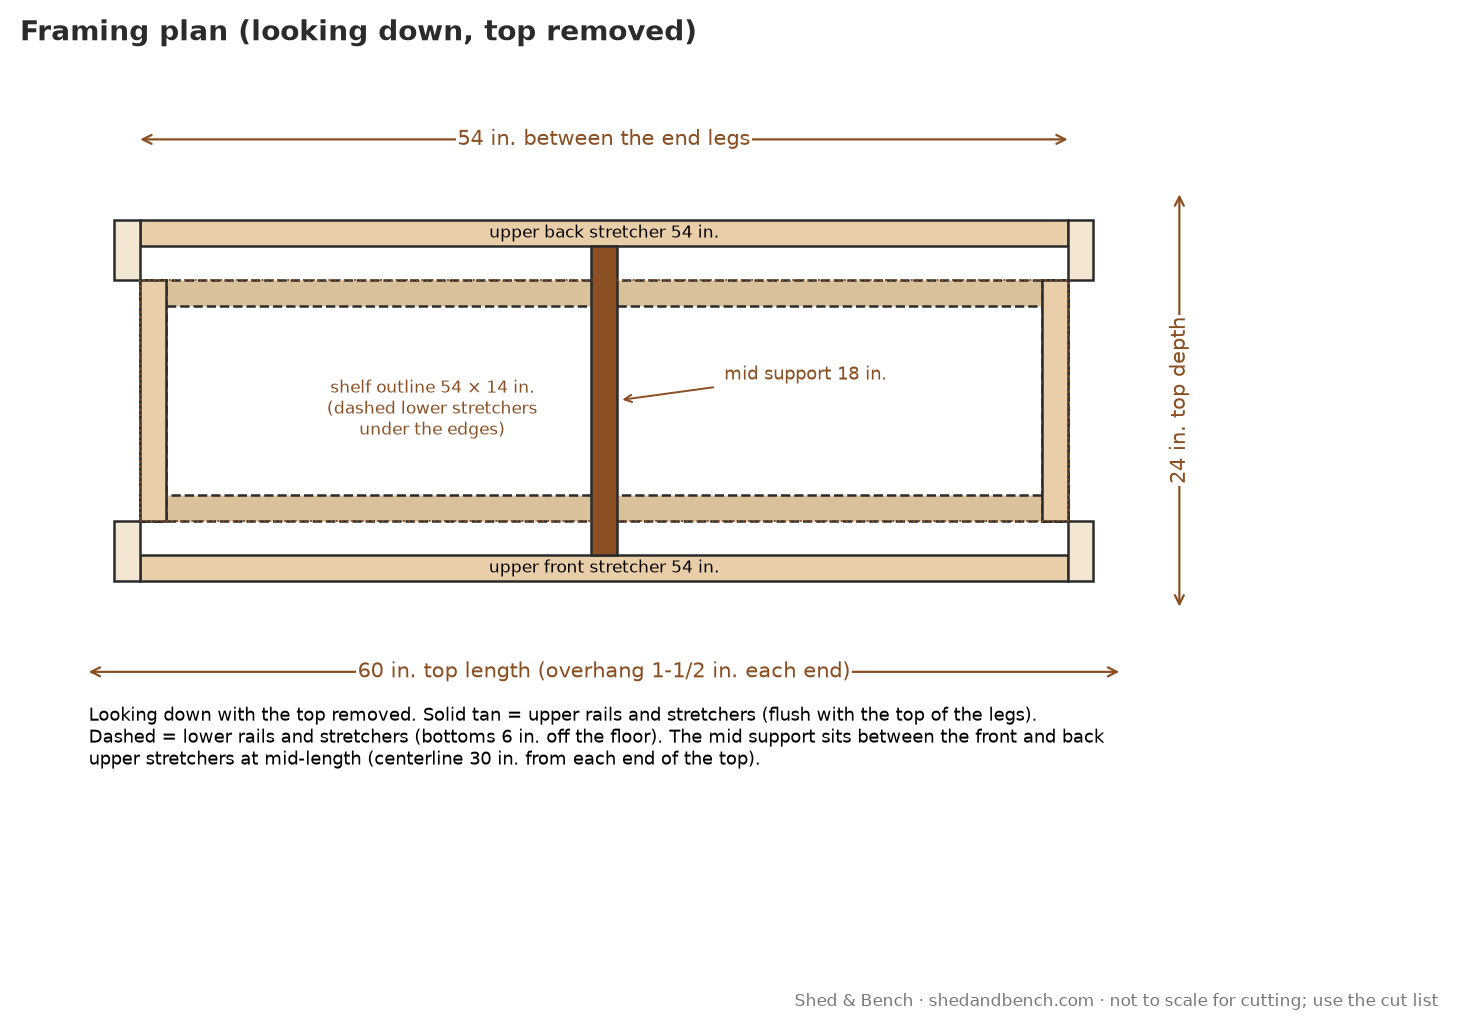
A mid support sits under the top at mid-length, so the plywood isn’t spanning the full 54 in. between the ends. That still leaves a span of about 26-1/4 in. between each end-leg’s inner face and the mid support. This design isn’t engineered or load-tested, and we haven’t checked that span against a published table. For heavier work, a second layer of 3/4 in. plywood is a common upgrade, but we haven’t drawn that here.
How many 2x4s do you need for a workbench?
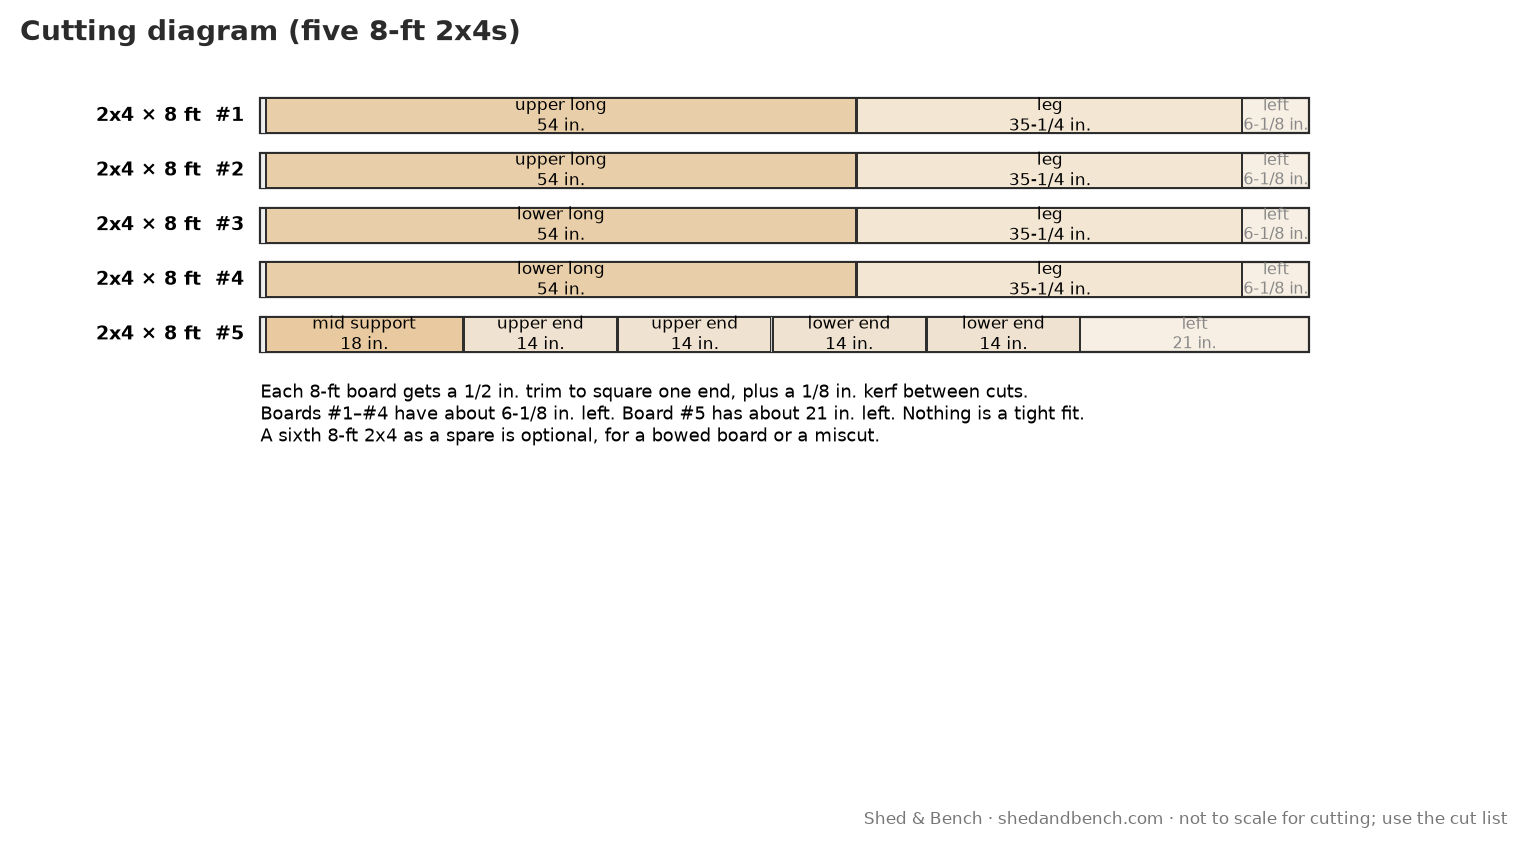
For this plan, you need five 2x4s at 8 ft and one 4×8 sheet of 3/4 in. plywood. That’s with every 2×4 cut planned out (see the cutting diagram below). Four boards each give you one 54 in. stretcher and one 35-1/4 in. leg, with about 6-1/8 in. left. The fifth board gives you the 18 in. mid support and the four 14 in. end rails, with about 21 in. left. Nothing is a tight fit.
If your store’s 2x4s are bowed, twisted, or badly crowned, buy a sixth 8-ft 2×4 as a spare so you can swap a bad board without another trip.
What wood should you use for a 2×4 workbench?
This plan is drawn for an indoor shop. Buy kiln-dried or select construction 2x4s, not pressure-treated lumber, unless the bench will live outdoors. Treated boards are often wetter and more likely to twist as they dry, and you don’t need a ground-contact rating on an indoor bench.
Pick the straightest boards you can, with a mild crown at most. Sight down each edge at the store. Stud-grade spruce, pine, or fir is the usual budget choice; a tighter grade costs more and is often straighter.
For the top and shelf, use 3/4 in. sanded plywood (AC or BC), not rough sheathing, if you want a smoother work surface. Run the face grain of the top along the 60 in. length. A hardwood-plywood top looks nicer and costs more; we haven’t drawn a solid-wood top.
If you later move the bench outside or into a damp shed, you’ll want a water-resistant finish and, for any wood that sits on soil, a different material choice than this indoor list.
Material list
Lumber
- Five 2×4 × 8 ft, kiln-dried or select construction lumber (optional sixth as a spare)
- One 4×8 sheet of 3/4 in. sanded plywood (AC or BC)
Hardware
- About 45 construction screws, 3 in. (the plan uses 36: two at each end of every rail, stretcher, and the mid support)
- About 55 wood screws, 1-5/8 in. or 2 in., for the top and the shelf (the plan uses 45)
- Optional: wood glue at the frame joints, 120-grit sandpaper, and a clear or paint finish
A note on cost: we don’t print a total, because lumber prices change by region and by week. Price the lumber and hardware list at your local store before you start.
Cut list
All sizes are actual dimensions (a dressed 2×4 is 1-1/2 × 3-1/2 in.).
| Part | Material | Qty | Length / size | Notes |
|---|---|---|---|---|
| Legs | 2×4 | 4 | 35-1/4 in. | Square ends; all four the same length |
| Upper long stretchers (front and back) | 2×4 | 2 | 54 in. | On edge, flush with the top of the legs, outer face flush with the front or back of the legs |
| Upper end rails | 2×4 | 2 | 14 in. | On edge, flush with the top of the legs, between the two legs of each end |
| Lower long stretchers (front and back) | 2×4 | 2 | 54 in. | On edge; sit against the inner faces of the legs so the shelf drops in |
| Lower end rails | 2×4 | 2 | 14 in. | On edge, between the legs, bottoms 6 in. above the floor |
| Mid support (under the top) | 2×4 | 1 | 18 in. | On edge, at mid-length, between the front and back upper stretchers |
| Top | 3/4 in. plywood | 1 | 60 in. x 24 in. | One rectangle; grain along the 60 in. length |
| Lower shelf | 3/4 in. plywood | 1 | 54 in. x 14 in. | One rectangle; drops in between the legs |
Cutting diagram: which parts come from which board
Each 8-ft 2×4 gets a 1/2 in. trim to square one end, plus a 1/8 in. kerf between cuts. Leftovers are listed in the diagram.
| Board | Cut from it |
|---|---|
| 2×4 x 8 ft #1 | upper long stretchers (front and back) (54 in.) + legs (35-1/4 in.) |
| 2×4 x 8 ft #2 | upper long stretchers (front and back) (54 in.) + legs (35-1/4 in.) |
| 2×4 x 8 ft #3 | lower long stretchers (front and back) (54 in.) + legs (35-1/4 in.) |
| 2×4 x 8 ft #4 | lower long stretchers (front and back) (54 in.) + legs (35-1/4 in.) |
| 2×4 x 8 ft #5 | mid support (under the top) (18 in.) + upper end rails (14 in.) + upper end rails (14 in.) + lower end rails (14 in.) + lower end rails (14 in.) |
Plywood: both the top and the shelf come out of one 4×8 sheet.
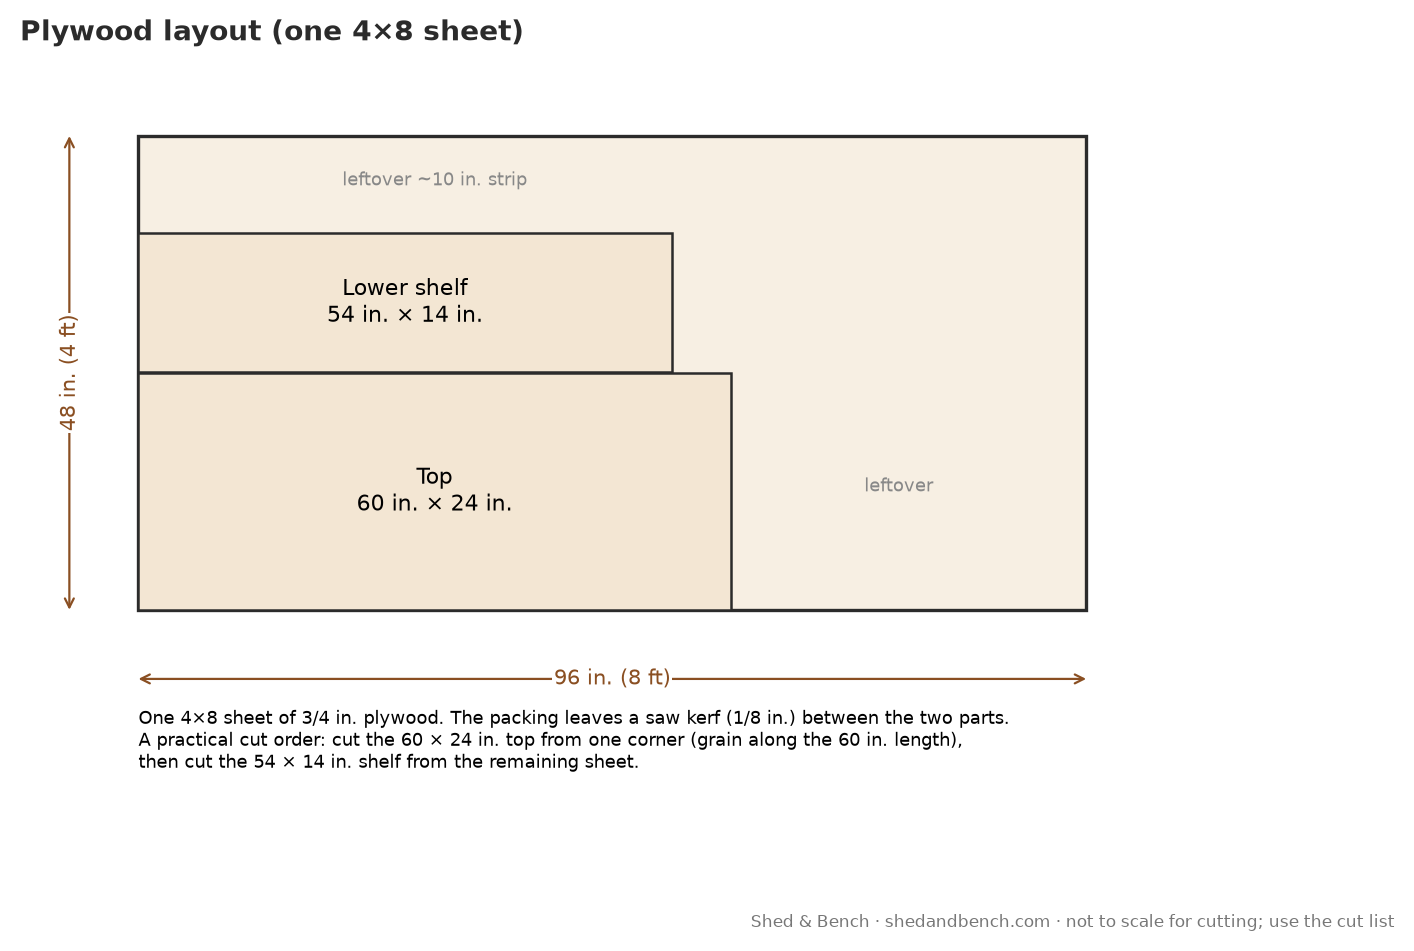
A practical cut order: cut the 60 in. × 24 in. top from one corner, with the face grain along the length, then cut the 54 in. × 14 in. shelf from the remaining sheet. Leave a 1/8 in. kerf between the two parts.
Not ready for a full bench yet? New to building? Warm up with the free projects in Your First 10 Weekend Builds, each with a materials list, then come back to this plan. Get the free guide →
Want more weekend projects? TedsWoodworking is a paid online plan collection, and the seller says it bundles over 16,000 plans. It isn’t made by Shed & Bench.
Affiliate link: we may earn a commission if you buy, at no extra cost to you. Affiliate disclosure.
How to build a 2×4 workbench, step by step
Pre-drill screw holes near board ends with the 1/8 in. bit so the wood doesn’t split. Wear safety glasses for every cut. Work on a flat garage floor or driveway so the ends come out square.
Step 1: Cut and prep the parts
- Cut the four 35-1/4 in. legs, the four 54 in. stretchers (two upper, two lower), the four 14 in. end rails (two upper, two lower), and the 18 in. mid support, following the cutting diagram so each board is used as planned.
- Cut the 60 in. × 24 in. top and the 54 in. × 14 in. shelf from the plywood sheet (see the plywood layout).
- Label each 2×4 as you cut it. The four stretchers are the same length, and the four end rails are the same length, but you’ll be glad you marked “upper” and “lower.”
- Ease the top edges people will lean on, and knock off splinters, with sandpaper. It’s easier now than after the top is on.
Step 2: Build the two end assemblies
Each end is two legs, one upper end rail, and one lower end rail.
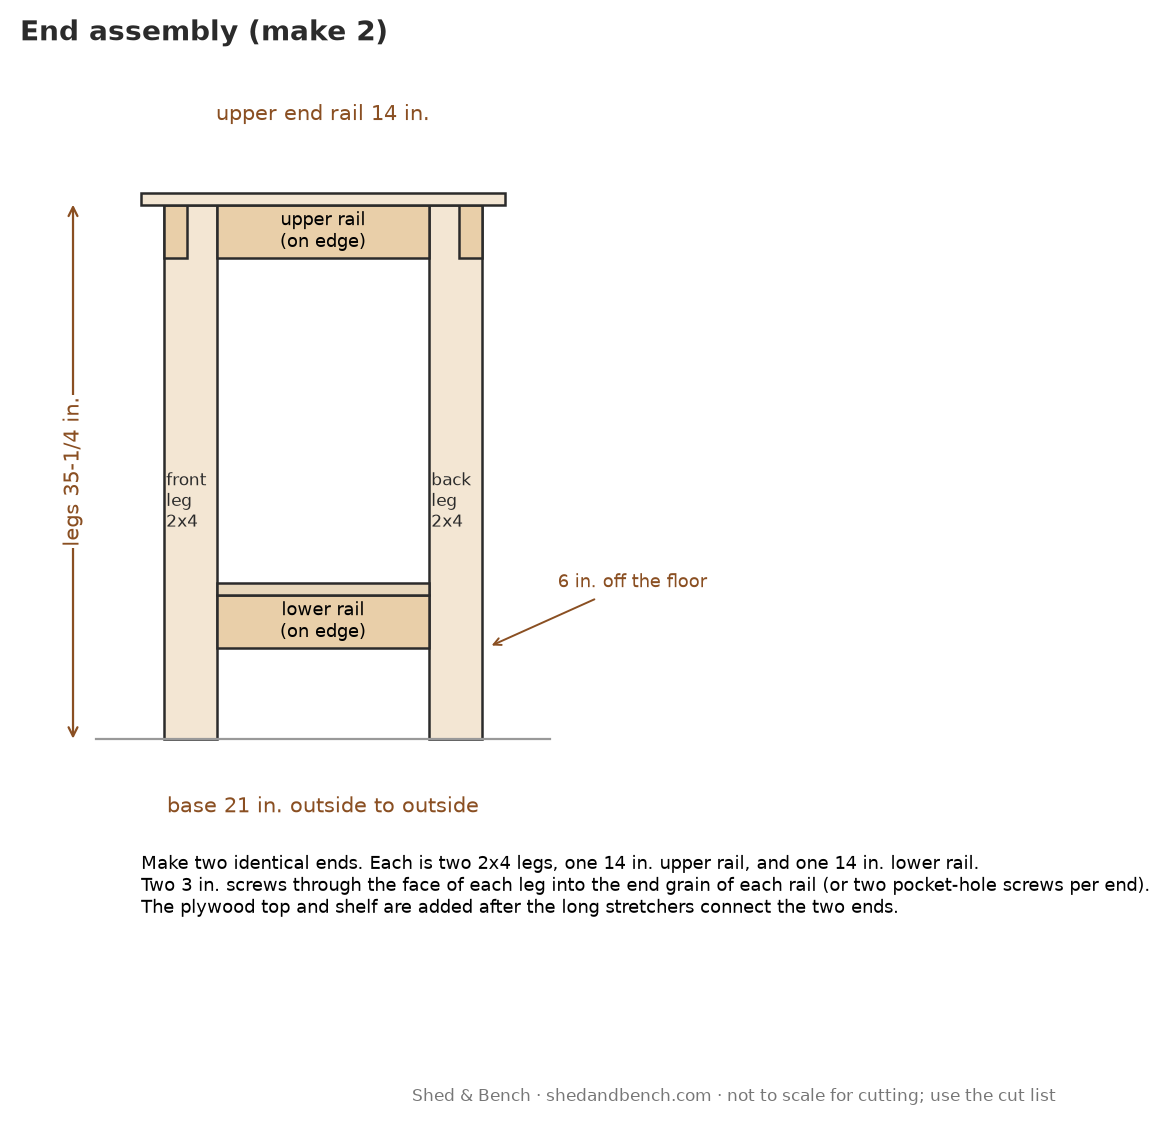
- On a flat surface, lay two legs on edge, 21 in. apart outside to outside, with the 3-1/2 in. face of each leg facing you (that’s the front or back of the bench).
- Set the upper end rail between the legs, flush with the tops, on edge. The rail is 14 in. long and fills the space between the inner faces of the legs.
- Set the lower end rail between the legs, also on edge, with its bottom edge 6 in. off the floor (the bottom ends of the legs).
- Square the corners and clamp. Drive two 3 in. screws through the face of each leg into the end grain of each rail (four screws per rail, eight per end). Pre-drill, and keep the screws square so they don’t blow out the side of the rail.
- Build the second end the same way, on top of the first if you want them to match.
Joints: the default in this plan is those through-screws into end grain. If you already have a pocket-hole jig, you can use two pocket-hole screws at each end of each rail and stretcher instead. That is optional; the plan does not depend on it.
Step 3: Connect the ends with the long stretchers
- Stand the two ends upright, 54 in. apart inside to inside (57 in. outside to outside). A helper makes this easier.
- Clamp the two upper long stretchers in place, on edge, flush with the tops of the legs. The outer face of the front stretcher should sit flush with the front of the legs, and the back stretcher flush with the back, so each one tucks under the 1-1/2 in. overhang of the top.
- Check the diagonals of the base (they should match, about 60-3/4 in. each) and that the frame isn’t racked.
- Drive two 3 in. screws through each leg into each end of each upper stretcher.
- Fit the two lower long stretchers against the inner faces of the legs, on edge, with their bottoms 6 in. off the floor, in line with the lower end rails. The four lower pieces now form a rectangular lip for the shelf to sit on. Screw them the same way: two 3 in. screws per end.
Step 4: Add the mid support and the top
- At mid-length (centerline 30 in. from each end of the top, which is also the midpoint between the end legs), set the 18 in. mid support on edge between the inner faces of the front and back upper stretchers, flush with the tops of those stretchers. Drive two 3 in. screws through each stretcher into the end grain of the mid support.
- Set the plywood top on the frame. The overhang should be 1-1/2 in. on all four sides. Check it with a tape at each edge before you drive screws.
- Screw the top down with 1-5/8 in. or 2 in. screws: about every 8 in. along the long edges (into the front and back stretchers), about every 6 in. along the short edges (into the end rails), and a short row into the mid support. Keep screws about 2 in. in from the corners of the plywood so you don’t split the end of a rail. The plan uses 27 screws in the top.
- Optional: run a bead of wood glue on the top edges of the stretchers and mid support before you set the top, if you don’t plan to take it off later.
Step 5: Add the lower shelf
- Drop the 54 in. × 14 in. shelf in between the legs so it rests on the four lower rails and stretchers. It should sit flush at the inner faces of the legs, with its top 10-1/4 in. off the floor.
- Screw it down with 1-5/8 in. or 2 in. screws, about every 8 in. along the long edges and every 6 in. along the short edges (18 screws in the shelf).
Step 6: Final checks
- Confirm the bench sits flat. If a leg is high, plane or sand a little off the bottom rather than shimming a shop bench if you can avoid it.
- Recheck every screw, especially the through-screws into end grain.
- Sand the top and the edges you’ll lean on. Ease the corners of the top so they don’t chip.
- Add a finish if you want: a clear oil or water-based polyurethane for an indoor bench, or paint. Let it cure before you use the top as a work surface.
Finishing and care
This bench is drawn for a dry indoor shop. Keep it off damp concrete if you can (a pair of rubber feet or a scrap of plywood under each leg is enough), and wipe up glue and finish spills so they don’t stain the top. Recheck the screws after the first few weeks, because 2x4s can move a little as they dry indoors. If a stretcher loosens, add a fresh screw rather than over-tightening a stripped hole.
Don’t use the lower shelf as a step, and don’t treat the top as a rated assembly bench. If you later want a harder surface, a replaceable 1/4 in. hardboard or plywood skin, cut to the same 60 in. × 24 in., is a common add-on, but we haven’t drawn the fastener pattern for that layer.
Variations
None of these are drawn in this plan; they’re notes so you don’t force a change that the cut list doesn’t cover.
- Shorter or taller bench: cut all four legs to the same new length before you build the ends, and keep the lower rails 6 in. off the floor. The buy list doesn’t change unless the legs get so long they no longer share a board with a 54 in. stretcher.
- Casters: we haven’t drawn a caster layout. If you add them later, choose locking casters rated for the bench plus a comfortable margin, and confirm the extra height still works for you. Adding casters under the legs changes how loads reach the floor, and this plan isn’t sized for that.
- A vise: a face vise needs a thicker jaw area and a different end layout than the 1-1/2 in. overhang shown here. We haven’t drawn one.
- Outdoor use: this indoor lumber list isn’t the right starting point. You’d want exterior-rated wood, exterior fasteners, and a different finish, and we haven’t drawn that version.
For more free plans, see our free plans page. For a weekend warm-up before you cut the plywood, get Your First 10 Weekend Builds.
Want more shop and weekend-project ideas? TedsWoodworking is a paid online plan collection with more benches, shop projects, and weekend builds to browse. The seller says it bundles over 16,000 plans (the seller’s count; one critic disputes it, see our review). It isn’t made by Shed & Bench. Read the review first, and check any plan all the way through before you build.
Disclosure: the link below is an affiliate link. If you buy through it, Shed & Bench may earn a commission at no extra cost to you. Affiliate disclosure.
Get the free guide: Your First 10 Weekend Builds
Ten simple, original beginner projects you can build with a drill, a saw, and a couple of clamps, each with a materials list. Sent to your inbox. Unsubscribe anytime. Some emails include clearly labeled affiliate recommendations. See our Privacy Policy.
This form is protected by reCAPTCHA, and the Google Privacy Policy and Terms of Service apply.
FAQs about 2×4 workbench plans
How many 2x4s do I need for a workbench?
For this plan, five 8-ft 2x4s plus one 4×8 sheet of 3/4 in. plywood. Four boards each give you one 54 in. stretcher and one 35-1/4 in. leg; the fifth gives you the 18 in. mid support and the four 14 in. end rails. A sixth 2×4 is an optional spare.
What size is a simple 2×4 workbench?
This one is 60 in. long, 24 in. deep, and 36 in. high, with a 3/4 in. plywood top, a 1-1/2 in. overhang on all sides, and a 54 × 14 in. lower shelf. Other sizes need their own cut lists; don’t scale this one by stretching the boards and leaving out the mid support.
How tall should a workbench be?
There’s no single right height. This plan uses 36 in. to the top, a common standing height. If you want it lower or higher, cut all four legs to the same new length before you assemble the ends.
Can I build a workbench with just 2x4s?
The frame in this plan is all 2x4s, but the top and the shelf are 3/4 in. plywood. A top made only of 2x4s is a different design, and we haven’t drawn one.
Do I need a pocket-hole jig to build this workbench?
No. The default joints are two 3 in. screws through each leg or stretcher into the end grain of the adjoining piece. A pocket-hole jig is an optional alternative at the same joints.
How much does it cost to build a 2×4 workbench?
We don’t print a total, because lumber prices change by region and week. Price five 8-ft 2x4s, one 4×8 sheet of 3/4 in. plywood, a box of 3 in. construction screws, and a box of 1-5/8 in. or 2 in. wood screws at your local store.
Are paid woodworking plan packages better than free plans?
Not necessarily. A good free plan gives you a complete cut list, clear steps, and dimensions you can check. Paid collections give you more choice, but quality can vary. If you’re considering one, read our TedsWoodworking review first.
Is there a free PDF of these 2×4 workbench plans?
Yes. The printable PDF has the shopping list, cut list, cutting diagrams, key steps, and all five diagrams. No email is required. Download it from the link near the top of this page.
Sources
A dressed 2×4 is 1-1/2 × 3-1/2 in.; those are the actual sizes used throughout this plan. All dimensions, cut lengths, board counts, and screw counts on this page were calculated and cross-checked in code by Shed & Bench. This design isn’t engineered or load-tested, and we haven’t checked the top span against a published span table.