
Disclosure: Shed & Bench is reader-supported and may earn a commission from some products we recommend, at no extra cost to you. The free printable plan on this page contains no affiliate links. Read our affiliate disclosure.
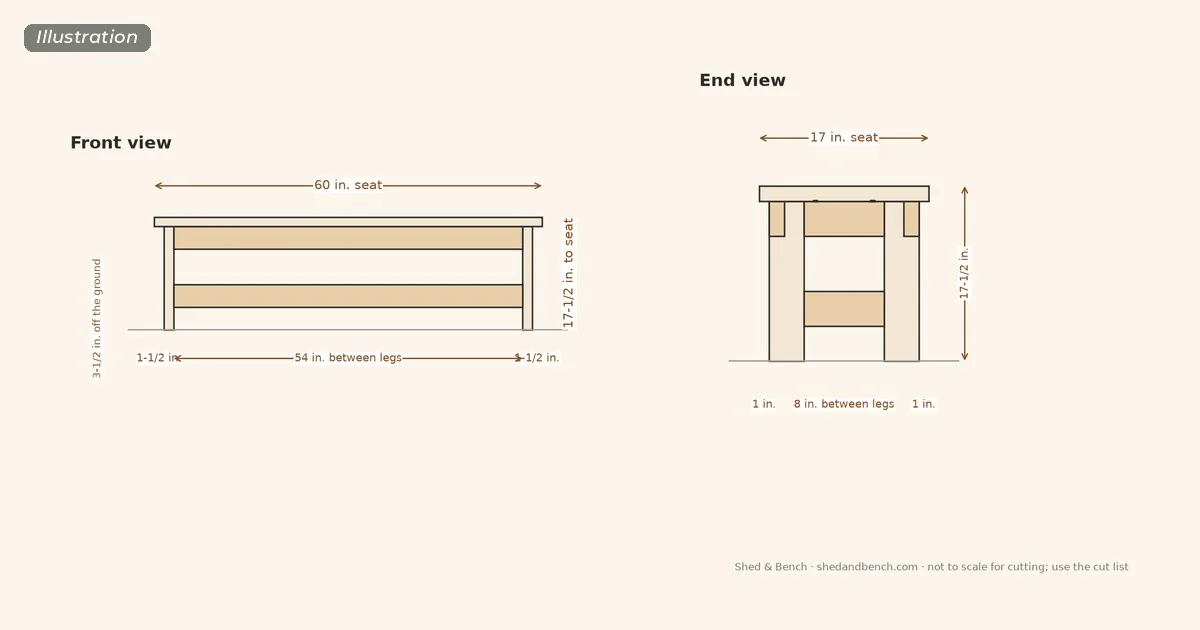
These free outdoor bench plans are for a simple, backless backyard bench, 60 in. long, 17 in. deep, and 17-1/2 in. high, built from three 8-ft 2x6s and three 10-ft 2x4s. The seat is three 2×6 slats with 1/4 in. gaps. The frame is two 2×4 end assemblies, front and back stretchers, and a mid support under the seat.
This is a new plan, not a relabel of another project on this site. It is a sitting bench, not a picnic table and not a shop workbench.
This design isn’t engineered or load-tested. No engineer has reviewed it. Shed & Bench worked out the dimensions and checked that the parts fit together on paper, but strength depends on your lumber, fasteners, anchors, and how the bench is used. Do not treat the sizes on this page as a rated capacity or a seating rating. If you expect heavy use, or you want a backed bench, have a local professional review a design before you build.
You get a lumber shopping list sized from real board lengths, a cut list in actual lumber sizes, board-by-board cutting diagrams, step-by-step instructions, five diagrams, and a printable PDF. The PDF has no links.
Free printable plan (PDF). Download the printable outdoor bench plan (PDF), no email required →
You can also browse our other free plans and the free beginner projects in Your First 10 Weekend Builds.
Who this plan is for
This plan is for someone who wants a straightforward outdoor bench that seats two people along a 60 in. slat, can be built with a saw, a drill, a square, and a couple of clamps, and can sit on a patio, a porch, or pavers in the yard. It is backless. If you want arms, storage, or a high back, that is a different design, and this cut list will not cover it.
The lumber is ordinary 2×4 and 2×6 stock. Choose wood and fasteners that can stay outdoors, as described in the wood and finish section below. This page does not give a service-life rating.
The plan at a glance
| Type | Backless outdoor bench |
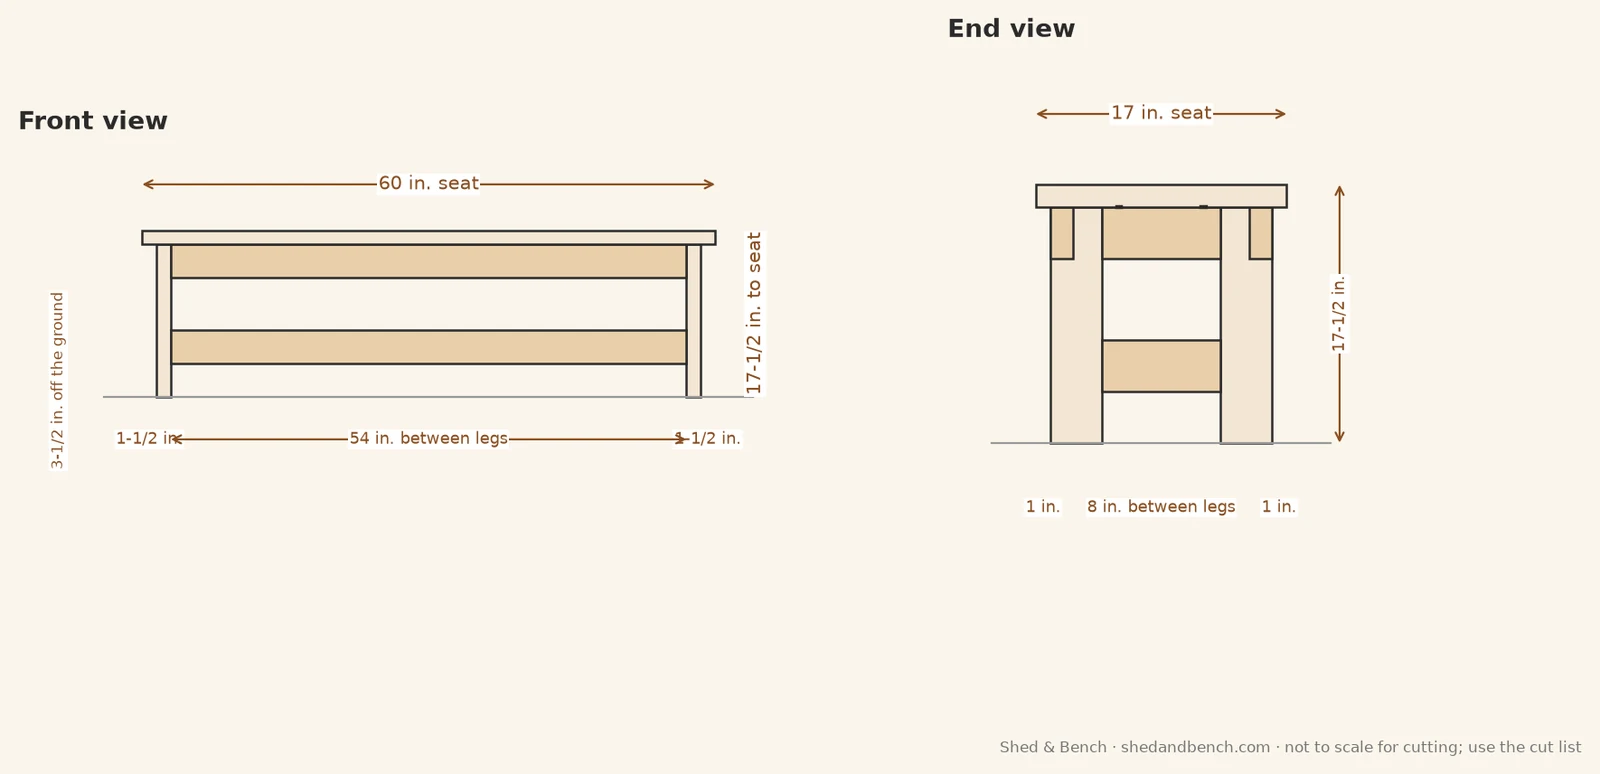
| Seat | 60 in. long × 17 in. deep × 17-1/2 in. high; three 2×6 slats with 1/4 in. gaps |
| Base | 57 in. long × 15 in. deep, outside to outside |
| End overhang | 1-1/2 in. past the legs at each end |
| Front and back overhang | 1 in. past the legs |
| Legs | Four 2x4s, 16 in. |
| Stretchers | Front and back upper and lower 2x4s, 54 in.; a mid support, 12 in., under the seat at mid-length |
| End rails | Upper and lower 2x4s, 8 in., at each end |
| Ground clearance | Bottoms of the lower stretchers sit 3-1/2 in. above the ground |
| Buy list | Three 8-ft 2x6s and three 10-ft 2x4s, plus exterior-rated screws |
Material list
Buy the boards below. Lengths are nominal store lengths; the cut list uses actual sizes after you square an end (a 1/2-in. trim allowance and a 1/8-in. kerf are built into the cutting diagrams).
| Buy | Size | Qty | Used for |
|---|---|---|---|
| 2×6 | 8 ft | 3 | Seat slats |
| 2×4 | 10 ft | 3 | Legs, stretchers, end rails, and mid support |
| Exterior-rated screws, 3 in. and 2-1/2 in. | — | about 75 | 3 in. for the frame joints; 2-1/2 in. for the seat slats (60 counted; buy-rounded) |
| Optional pavers or patio blocks | sized to the legs | 4 | If you want the legs up off wet soil |
Use fasteners the maker rates for exterior use. For copper-based pressure-treated lumber, stay with hot-dip galvanized or stainless fasteners unless the preservative supplier specifies something else.
No prices are listed. Lumber prices change by region and by week. Price this list at your local store on the day you buy.
Cut list
| Part | Material | Qty | Length / size | Notes |
|---|---|---|---|---|
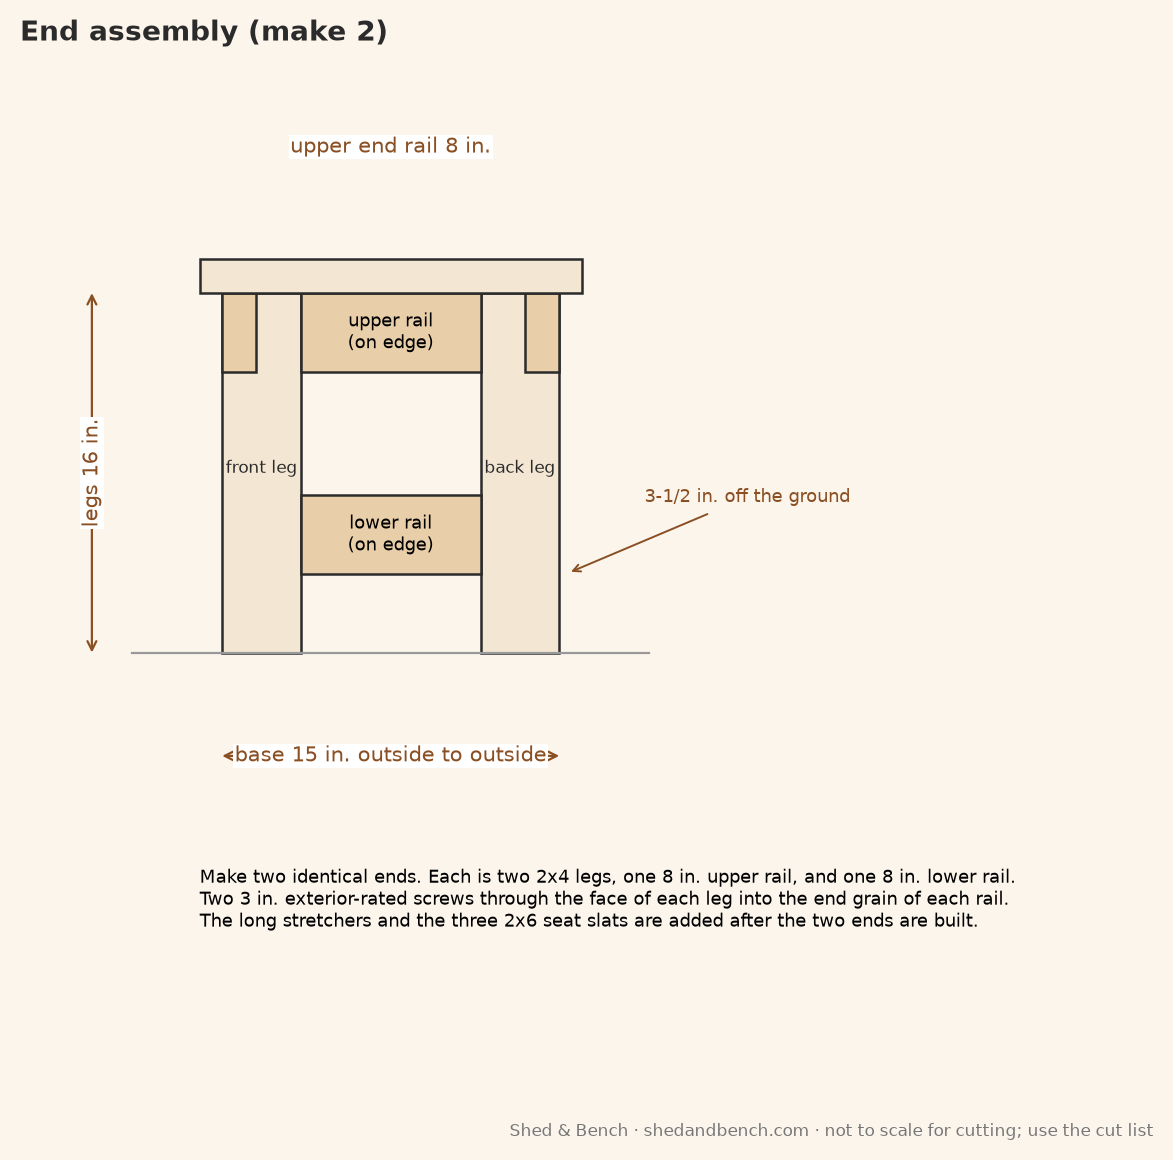
| Legs | 2×4 | 4 | 16 in. | Square ends; all four the same length |
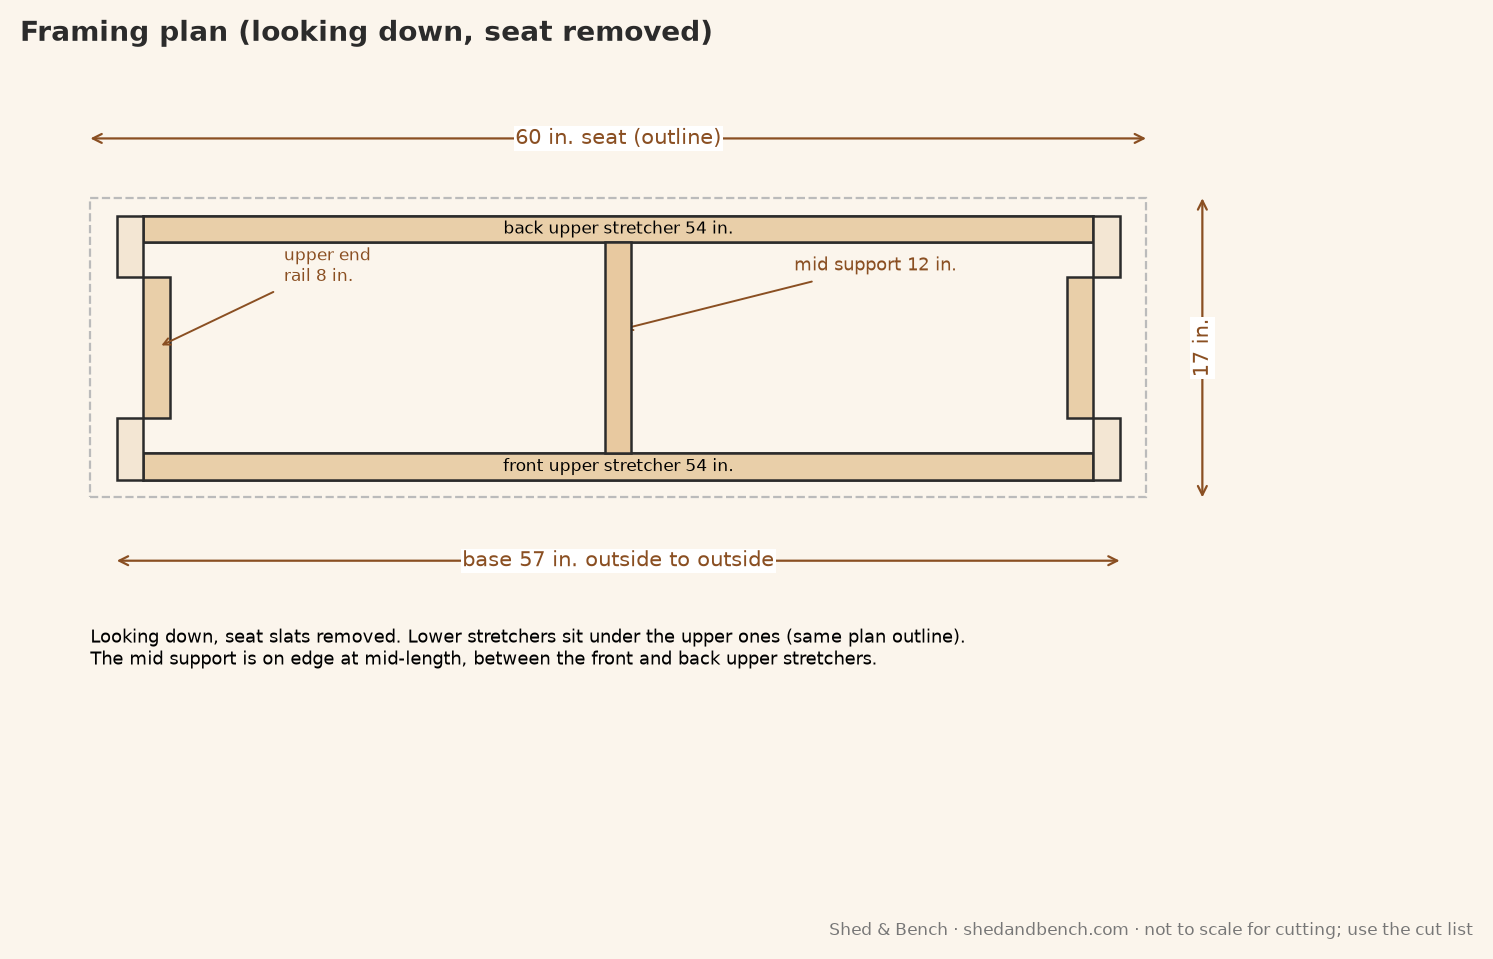
| Upper long stretchers (front and back) | 2×4 | 2 | 54 in. | On edge, flush with the top of the legs, outer face flush with the front or back of the legs |
| Upper end rails | 2×4 | 2 | 8 in. | On edge, flush with the top of the legs, between the two legs of each end |
| Lower long stretchers (front and back) | 2×4 | 2 | 54 in. | On edge; bottoms 3-1/2 in. above the ground, outer face flush with the front or back of the legs |
| Lower end rails | 2×4 | 2 | 8 in. | On edge, between the legs, bottoms 3-1/2 in. above the ground |
| Mid support (under the seat) | 2×4 | 1 | 12 in. | On edge, at mid-length, between the front and back upper stretchers |
| Seat slats | 2×6 | 3 | 60 in. | On the flat; 1/4-in. gaps between slats; grain along the 60 in. length |
Cutting diagrams: which parts come from which board
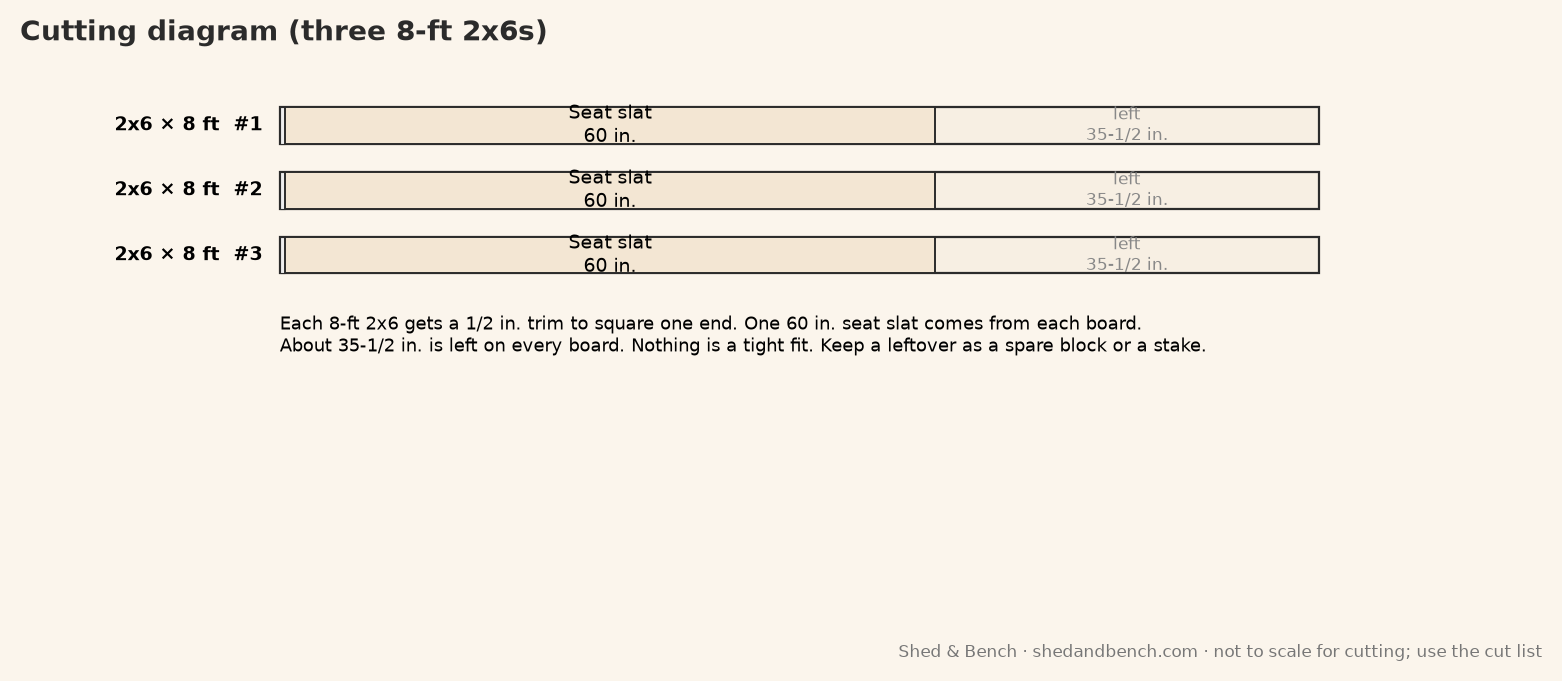
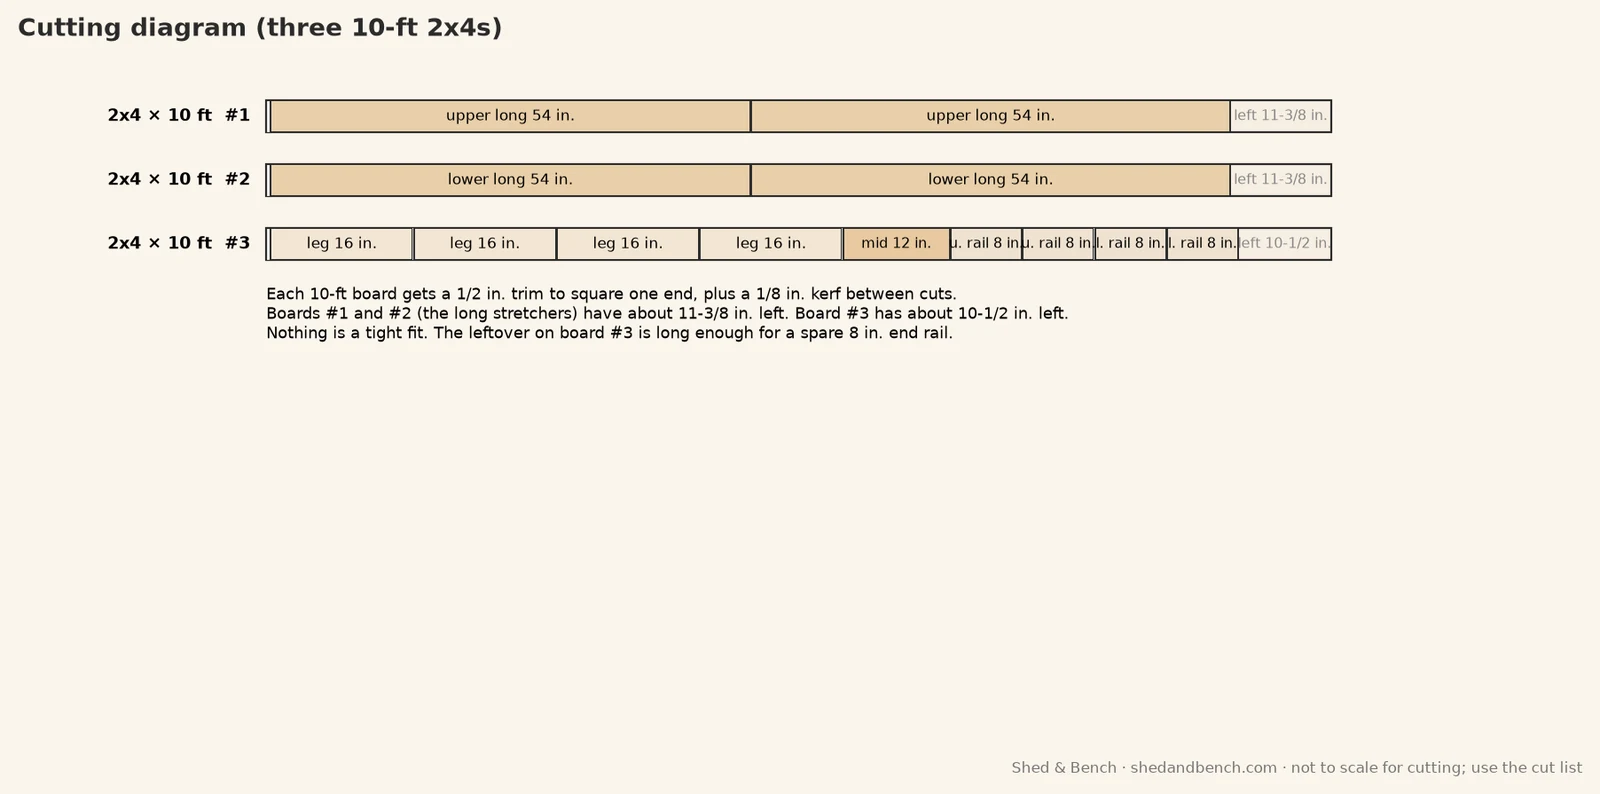
The table below shows which parts come from which board.
| 2×6 (seat slats) | Cut from it |
|---|---|
| 2×6 x 8 ft #1 | seat slat (60 in.) |
| 2×6 x 8 ft #2 | seat slat (60 in.) |
| 2×6 x 8 ft #3 | seat slat (60 in.) |
| 2×4 x 10 ft (long stretchers) | Cut from it |
|---|---|
| 2×4 x 10 ft #1 | upper long stretcher (54 in.) + upper long stretcher (54 in.) |
| 2×4 x 10 ft #2 | lower long stretcher (54 in.) + lower long stretcher (54 in.) |
| 2×4 x 10 ft (legs, end rails, and mid support) | Cut from it |
|---|---|
| 2×4 x 10 ft #1 | leg (16 in.) + leg (16 in.) + leg (16 in.) + leg (16 in.) + mid support (12 in.) + upper end rail (8 in.) + upper end rail (8 in.) + lower end rail (8 in.) + lower end rail (8 in.) |
Each 8-ft 2×6 has about 35-1/2 in. left after one seat slat. Each 10-ft stretcher board has about 11-3/8 in. left. The third 10-ft 2×4, which holds the legs, end rails, and mid support, has about 10-1/2 in. left — long enough for a spare 8 in. end rail if you want one.
Want more weekend projects? TedsWoodworking is a paid online plan collection, and the seller says it bundles over 16,000 plans. It isn’t made by Shed & Bench.
Affiliate link: we may earn a commission if you buy, at no extra cost to you. Affiliate disclosure.
How to build the outdoor bench, step by step
Wear eye and hearing protection. Pre-drill near board ends. This design isn’t engineered or load-tested. Square each assembly as you go.
Step 1: Cut and label the parts
Cut the three 60 in. seat slats from the 8-ft 2x6s, and cut the 2×4 parts from the three 10-ft boards, following the cutting diagrams: four 16 in. legs, two 54 in. upper stretchers, two 54 in. lower stretchers, two 8 in. upper end rails, two 8 in. lower end rails, and one 12 in. mid support. Label each part. Square the ends, and ease the top edges of the seat slats if you want a softer sit.
Step 2: Build the two end assemblies
Each end is two legs, one upper rail, and one lower rail. Lay two legs 15 in. apart outside to outside. Set the upper rail between the legs, flush with the tops, on edge. Set the lower rail with its bottom 3-1/2 in. off the floor, on edge. Square the assembly, clamp it, and drive two 3 in. exterior-rated screws through each leg into the end grain of each rail. Build the second end the same way.
Step 3: Connect the ends with the long stretchers
Stand the ends 54 in. apart inside to inside (57 in. outside to outside). Clamp the upper long stretchers flush with the tops of the legs, outer faces flush with the front and back of the legs. Check the diagonals (about 59 in. each). Drive two 3 in. screws through each leg into each stretcher end. Fit the lower long stretchers the same way, with their bottoms 3-1/2 in. off the floor, outer faces flush with the front and back of the legs, and screw them the same way.
Step 4: Add the mid support
Set the 12 in. mid support on edge between the front and back upper stretchers at mid-length (centerline 30 in. from each end of the seat), flush with the tops of those stretchers, and drive two 3 in. screws at each end. The mid support is there to shorten the span under the seat slats. It is not a rated beam, and this plan does not give a load figure for it.
Step 5: Attach the seat slats
Lay the three 2×6 slats on the frame, with the 60 in. length running along the bench and a 1/4 in. gap between slats. Keep a 1-1/2 in. overhang at each end and a 1 in. overhang at the front and at the back. The front slat should cover the front upper stretcher, the back slat should cover the back upper stretcher, and all three slats should cross the mid support. Screw each slat down with 2-1/2 in. exterior-rated screws: two at each end, two into the mid support, and three along each outer slat into the front or back upper stretcher.
Step 6: Set the bench and check it
Set the bench on a reasonably level, firm surface. Pavers or patio blocks under the four legs keep the feet up if the soil stays wet. Confirm the bench sits flat, the overhangs are still 1-1/2 in. at the ends and 1 in. at the front and back, and every screw is tight. Do not climb or stand on the bench. Recheck the screws after the first season outdoors, and after any hard move.
Wood, fasteners, and finish
Outdoor benches stay wet more often than indoor furniture, so the wood and the fasteners matter as much as the cut list. This section is a short guide, not a species-by-species comparison. For a closer look at the options, see our guide to the best wood for outdoor furniture.
Two different problems show up outdoors. Weathering is the slow surface change caused by sun and moisture. Decay is the growth of fungi in damp wood. The USDA Forest Products Laboratory Wood Handbook (FPL-GTR-282, 2021, Chapter 14) notes that typical wood-decay fungi need moisture, and that untreated sapwood of essentially all species has low decay resistance. The same chapter groups some naturally durable heartwoods — including listed cedars, old-growth redwood, and white oak — as resistant for aboveground service where decay is a hazard. It also says precise service-life ratings are not possible, because of differences within a species and in service conditions. This plan does not give a year-count.
Pressure-treated pine is a common choice for a bench that may sit on soil or stay damp around the feet. If the legs sit on the ground, look for lumber the tag rates for ground contact; if the bench will stay on a dry patio or on pavers, an aboveground rating may match the exposure — follow the tag, not this page. FPL’s Guidelines for Selection and Use of Pressure-Treated Wood (FPL-GTR-275, 2019) notes that corrosion of metal fasteners is a concern wherever moisture is present, that some copper-containing waterborne preservatives can increase the corrosion rate, and that protection is still required because corrosion is always possible when moisture is present. Use a fastener the maker rates for exterior use, and for treated lumber follow the preservative supplier as well. Do not use interior or electroplated drywall screws.
A finish is optional. Chapter 16 of the Wood Handbook (Hunt, 2021) treats finishing as a way to address weathering, and it says paint is not a preservative and will not prevent decay if the wood is moist. If you finish the bench, use a product the maker rates for exterior use, and follow that label for prep and recoating. You can also leave naturally durable or treated wood unfinished if you accept the color change and checking that come with the weather.
Keep the lower stretchers and the feet from sitting in a puddle. The 3-1/2 in. gap under the lower rails is there for airflow, not as a rated clearance. Brush off leaves and soil that stay against the wood.
Siting and care
Set the bench where water can drain away from the feet, not into a dip that holds a puddle. A reasonably level patio, porch, or set of pavers is a better long-term site than bare soil that stays wet. If you do set it on soil, the pressure-treated or naturally durable choice for the legs matters more, and you should still keep leaves and mulch from piling against the feet and the lower stretchers.
Leave a little air around the bench. Do not push it tight against a wall or a planter that traps moisture along one side. After a hard rain, tip out any water that sits on the seat slats, and let the gaps between the 2x6s do their job.
Recheck the screws after the first few weeks outdoors, and again after the first season, especially the through-screws into end grain at the legs. Wood moves as it wets and dries, and a loose joint should be tightened rather than ignored. If you want to store the bench under cover for the off season, that is optional; this plan does not require it, and it is not a substitute for choosing outdoor-rated wood and fasteners in the first place.
Do not stand on the seat, and do not use the bench as a step or a sawhorse. Those are different loads than sitting, and this design isn’t engineered or load-tested for them.
Variations
Do not add a tall back, arms, or a storage chest to this cut list by guessing at longer posts or extra slats. A back changes the loads when someone leans, and that would be a different design, which we have not drawn. If you want a backed garden bench, look for a plan that sizes the back, or have a local professional review one.
You may set the bench on pavers instead of on the ground. A shorter bench would need its own cut list and a new packing check on the boards; this page does not include one. Do not lengthen the seat past 60 in. on this frame; a longer span is a different design.
Want more outdoor-furniture and weekend-project ideas? TedsWoodworking is a paid online plan collection with more outdoor and shop projects to browse. The seller says it bundles over 16,000 plans (the seller’s count; one critic disputes it, see our review). It isn’t made by Shed & Bench. This outdoor bench plan is our own. Do not treat a plan from that collection as a substitute for an engineered design. Read the review first, and check any plan all the way through before you build.
Disclosure: the link below is an affiliate link. If you buy through it, Shed & Bench may earn a commission at no extra cost to you. Affiliate disclosure.
Get the free guide: Your First 10 Weekend Builds
Ten simple, original beginner projects you can build with a drill, a saw, and a couple of clamps, each with a materials list. Sent to your inbox. Unsubscribe anytime. Some emails include clearly labeled affiliate recommendations. See our Privacy Policy.
This form is protected by reCAPTCHA, and the Google Privacy Policy and Terms of Service apply.
FAQs about outdoor bench plans
How long is this outdoor bench?
The seat is 60 in. long and 17 in. deep, and it sits 17-1/2 in. high. The frame is 57 in. long and 15 in. deep, outside to outside, with a 1-1/2 in. overhang at each end and a 1 in. overhang at the front and back.
How many 2x4s and 2x6s do I need?
Three 8-ft 2x6s and three 10-ft 2x4s. Each 2×6 yields one 60 in. seat slat. The 2x4s yield the four legs, the four long stretchers, the four end rails, and the mid support, as shown in the cutting diagrams. Hardware is a shopping estimate of about 75 exterior-rated screws, not a rated fastener schedule.
Is this a bench with a back?
No. This plan is for a backless bench. A back is a common request, but it changes the loads when someone leans, and we have not drawn one. Do not add a back to this cut list by extending the rear legs. That would be a different design.
Can I build this as a garden bench?
Yes, if what you want is a simple sitting bench for a patio, a porch, or a yard. “Garden bench” often means a bench with a back and arms. This plan does not include those. Keep “garden bench plans” in mind as a related search, but use this cut list only for the backless bench drawn here.
What wood should I use for an outdoor bench?
Use a naturally durable heartwood, or pressure-treated lumber whose tag matches the exposure, and use exterior-rated fasteners. The Wood Handbook (FPL-GTR-282, 2021, Chapter 14) is the source for the decay-resistance grouping mentioned above; this page does not give a year-count or name a single best species. Our guide to the best wood for outdoor furniture compares outdoor-furniture woods in more detail.
Does this bench need a finish?
No. A finish is optional. It can slow weathering (color change, checking, and surface wear), but the Wood Handbook (Chapter 16) says paint is not a preservative and will not prevent decay if the wood is moist. If you finish the bench, use a product rated for exterior use and follow the label.
Is there a free PDF of these outdoor bench plans?
Yes. The printable PDF has the shopping list, cut list, cutting diagrams, key steps, and all five diagrams. No email is required. Download it from the link near the top of this page. The PDF has no links.
Are paid bench plan packages better than free plans?
Not automatically. A good plan, free or paid, shows its sizes, its limits, and a cut list that matches the steps, and it says whether it was engineered. This plan is free and is not engineered or load-tested. For how we look at one popular paid collection, see our TedsWoodworking review.
Sources
Wood and fastener notes in this guide come from these references, checked on Friday, Nov 13, 2026, not from tests by Shed & Bench:
- Arango, R.A.; Lebow, S.; Glaeser, J.A. 2021. Chapter 14: Biodeterioration of wood. In: Wood handbook—wood as an engineering material. FPL-GTR-282. Madison, WI: USDA Forest Service, Forest Products Laboratory. research.fs.usda.gov/treesearch/62262
- Hunt, C.G. 2021. Chapter 16: Finishing wood. FPL-GTR-282. research.fs.usda.gov/treesearch/62269
- Lebow, S.T.; Tang, J.D.; Kirker, G.T.; Mankowski, M.E. 2019. Guidelines for Selection and Use of Pressure-Treated Wood. FPL-GTR-275. research.fs.usda.gov/treesearch/59612